Traditional Stained Glass windows and Tiffany style lamps are made by cutting colored glass into shapes, arranging them into a pattern, affixing a lead strip around the edges, then soldering the leaded edges together.
I don't do that.
I make window hangings and large sun-catchers using translucent paint on a solid pane of regular old clear glass.
I call them Stained Glass Paintings.
I don't do that.
I make window hangings and large sun-catchers using translucent paint on a solid pane of regular old clear glass.
I call them Stained Glass Paintings.
About the process
I start with a pane of glass from a standard picture frame. Old glass is best, it's thicker. I find them at thrift stores and garage sales. I've also painted on reclaimed window panes found at my local Habitat for Humanity ReStore, they have nice large sized panes of thick glass.
First I clean the glass, then cover the edges with black vinyl electrical tape and trim the excess with a craft knife. I do this to protect my fingers, the glass is very sharp. Bonus, it creates an unpainted edge that fits better into the frame.
Next I draw a template using a dry erase pen or a Sharpie permanent marker. It's easy to make quick changes this way and add or remove elements; just by wiping it off the glass and redrawing it.
Design ideas are drawn on the glass with a permanent marker or dry erase pen
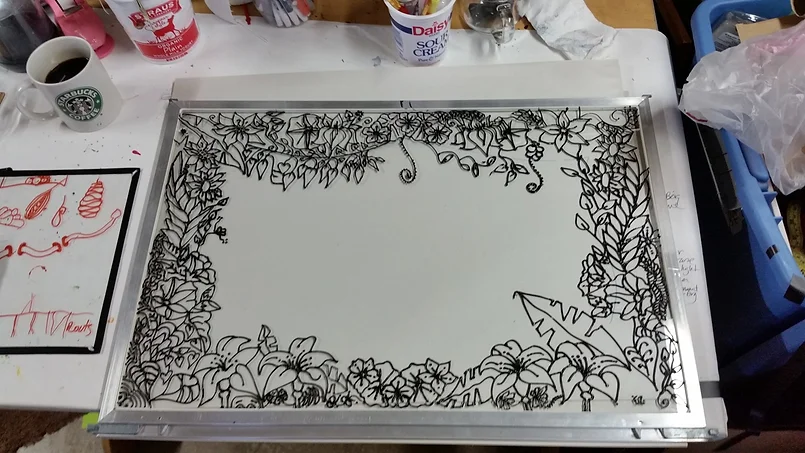
Once I am happy with the design I turn the glass over to the front side and apply black "lead lines" using my colored marker template as a guide. The outlines are applied using a thick black paint medium that takes a few hours to dry, I usually let them sit overnight.
The goal here is to create "walls" that are high enough to contain your paint so that it does not flow into a neighboring section.
The goal here is to create "walls" that are high enough to contain your paint so that it does not flow into a neighboring section.
Above: Showing "Lead lines" applied on reverse side of the glass where I made a draft in dry erase pen. Sometimes I just wing it and draw the outlines directly onto the plain glass with the paint, no first draft. Allow the lead lines to dry (usually overnight until they are rock solid) then turn the glass over to the back side and clean off all the permanent marker with rubbing alcohol (isopropyl alcohol) and a paper towel (or just a dry paper towel if I used a dry erase pen).
To correct mistakes made with the lead lines you have 2 options:
1. Correct it immediately by wiping off the mistake while it is still wet. This is easy if there are no lead lines nearby that you want to keep, just wipe it off with a paper towel. But if the mistake is very near to a good section that you don't want to disturb, the safest thing to do is:
2. Allow the paint to completely dry overnight, then cut out the section you want to remove with an X-Acto Knife or other brand of craft or hobby knife.
Finally I add translucent colored paint to the sections. The colored glass sections can be made to have "texture" by applying gloss gel medium and shaping it with various tools.
1. "Lead lines" applied on glass and fully dried for 24 hours.
2. Translucent glass paint applied, textured and dried for 24 hours.
2. Translucent glass paint applied, textured and dried for 24 hours.
It takes the translucent paint a few days to fully dry, then I get to work on the frames. Usually I will sand the wood, re-stain it if necessary, and build a brace for the back to hold the glass pane with the least amount of obstruction.
A gallery of my work, with simple tutorials and materials list to make your own.
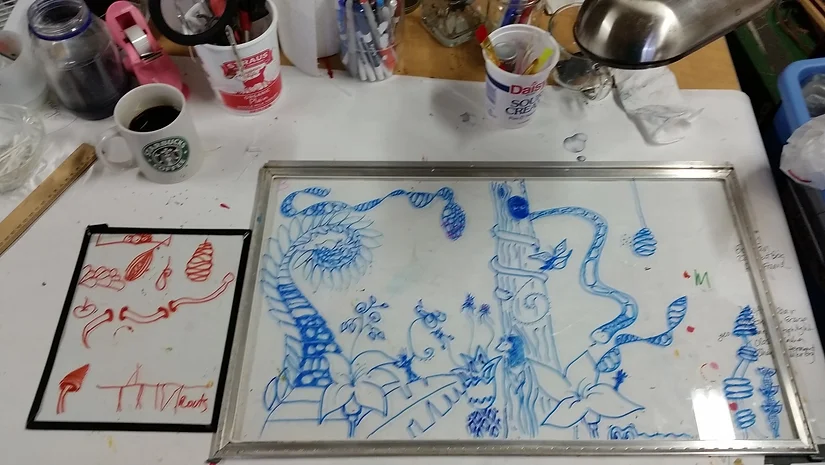
Left: an 8x10 sheet of glass with vinyl Electricians tape covering the edges, design ideas drawn on with red sharpie permanent marker
Right: a large pane of glass with built-in aluminum frame, design ideas drawn on with blue dry erase pen
Right: a large pane of glass with built-in aluminum frame, design ideas drawn on with blue dry erase pen
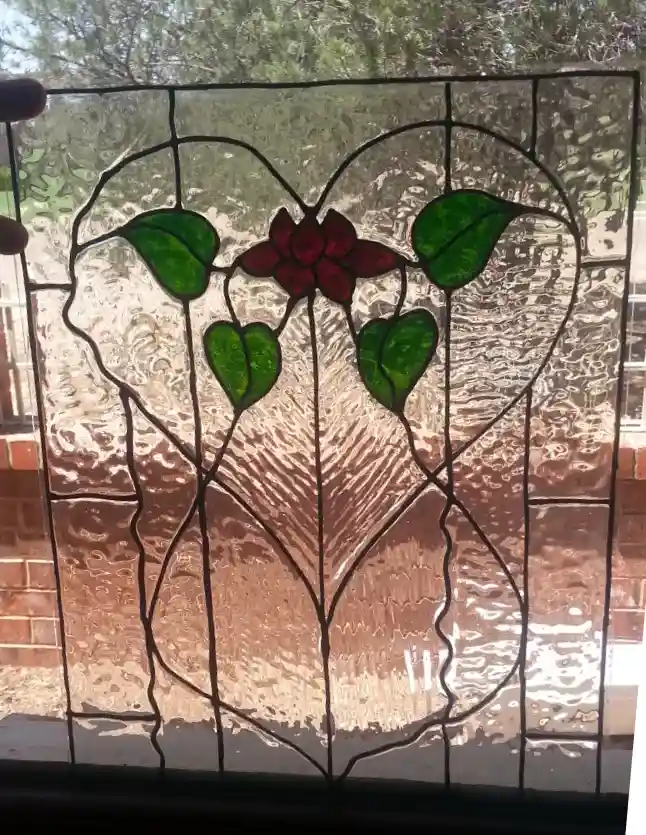
This piece was made using only Gallery Glass paints on a reclaimed piece of picture frame glass. The design sits on the glass permanently but it could technically be pulled off in one solid piece and stuck on a window because the nature of this paint dries to a rubbery flexble finish.
This is also an example of what happens when the lead lines do not have sufficient time to completely dry! When I applied the lines they were straight, however I did not wait long enough for the lines to dry before pouring in the liquid color, so the lines became soft and ended up curvy and squiggly.
The lead lines may feel dry on the outside after a few hours, but they will not be solid until the next day. (This is also why DecoArt Black Leading was on of my favorites before it was discontinued, it dried fast and I could continue working on a project the same day rather than the next day.)
This piece was made using Pebeo Vitrail paints for the colors and Liquitex Gloss Gel Medium for the clear sections and the texturing over the colors. While the gloss gel medium (which is opaque white, not clear until it is dry) is still wet it can be shaped into textures using a variety of tools. I mostly use a rubber gloved finger to make all my textures, but you can also use an artists knife, a paintbrush, sponge, rubber stamps, or really anything you can think of or have on hand!
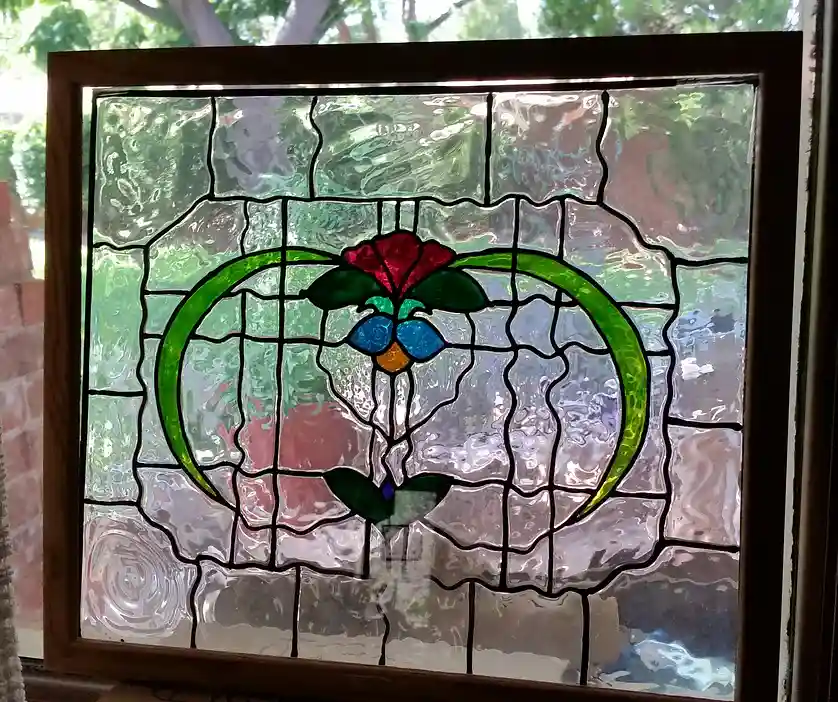
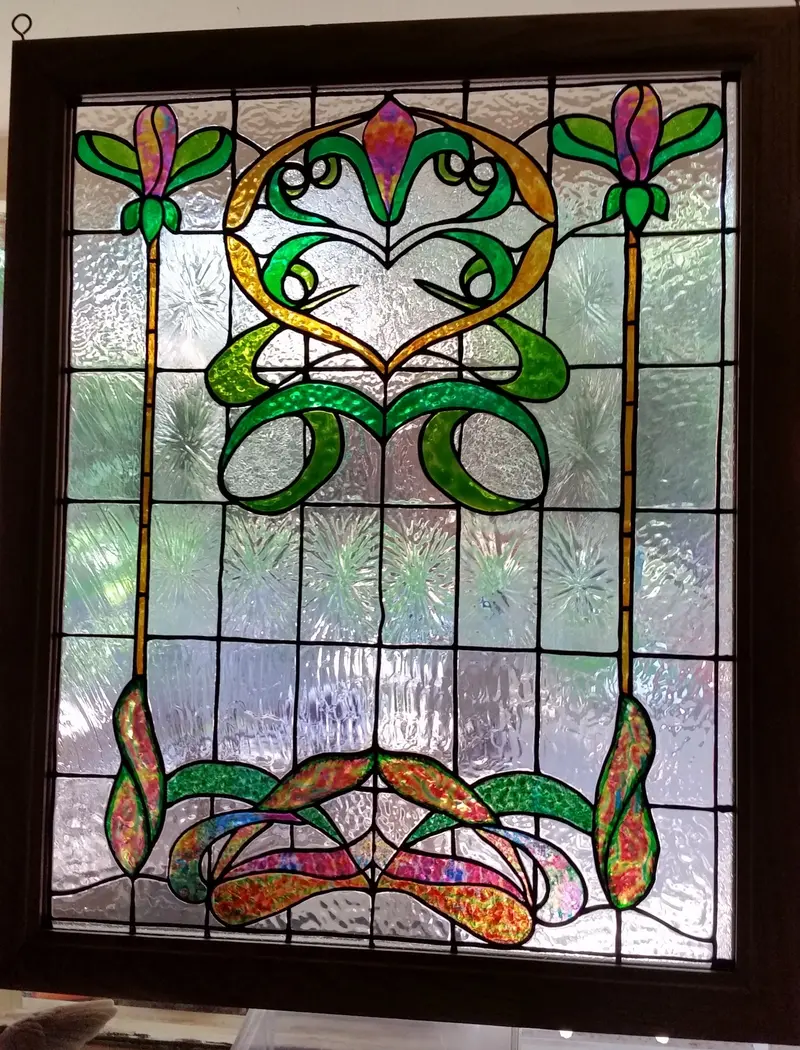
This Art Deco style window was made using Self-Adhesive Strips (instead of liquid leading) and Clear Gloss Gel Medium. The self-adhesive strips are available in either a continuous roll of actual lead, or on a sheet of rubbery synthetic strips. They are applied to the glass and pressed into place with a burnishing tool. Burnishing in this case means pressing against, flattening the surface, and securing the self-adhesive backing to the substrate. With premade strips you can easily make nice straight uniform lines that are flexible enough to make small curves. After the lines are applied to the glass you can immediately start applying the paint. I generally only use these premade adhesive lines when the design will use textured clear paint, not colors, because the lead strips do not result in a wall that is high enough to contain the liquid paint without it spilling over the line (unless the color is applied sparingly, or significantly thickened and applied with a brush.)
Materials List for this project
Pebeo Vitrail 843001 Self-Adhesive Lead Strips
This product is a roll of adhesive backed lead strip, about 1/4" wide x 33 feet long (6mm wide x 10 meters long). The 1/4" inch width is scored down the middle so you can either use it as it comes for 1/4" wide lines, or you can easily cut it down the middle with a craft knife to make 66 feet of 1/8" inch wide strip, depending on your design and the effect you want to create. Each roll comes with a burnishing tool to affix the strip to the glass. This product is made of real lead (element pb, atomic number 82) so I take extra care while handling it by wearing disposable gloves and thoroughly washing my hands if I've touched it with bare fingers before it's covered with paint. Lead poisioning is serious business, remember what happened to the Romans!
Another option for adhesive-backed real lead strips is Whittemore Durgin Self Adhesive Lead. These come in in 1/8" (3mm), 1/4" (6mm), or 3/8" (9mm), in roll lengths of 33 feet (10 meters), 66 feet (20m), 82 feet (25m), or 164 feet (50m).
A lead-free option for self adhesive strip line is Gallery Glass 16690 Instant Lead Lines
These are 1/8" wide x 12" inches long strips and made of a flat rubbery material. I have tried this product and it works fine in some situations but I do prefer the Pebeo Lead Strips, I find them a bit easier to work with and feel like the final product looks more professional, in my opinion. But for quick inexpensive projects, the Gallery Glass self-adhesive strips will work just fine. This product has no real height to it, it's maybe 1/16" high, so you cannot just pour liquid color in the sections and expect it to stay before it cures. You will need to use a paint like Gallery Glass which is thicker, but even with that you will need to be careful at the edges so the colors don't bleed into each other, because these strip lines will absolutely not hold fluid color in a section, they are simply flat strips for effect.
Liquitex Professional Gloss Gel Medium
Clear Gloss Gel Medium - any brand will work as long as it dries clear. I like this brand and this particular one is heavy-bodied, so it holds more complex shapes and dries slower, giving you more working time.
This is a large window cling (about 12" x 12" inches) made using Gallery Glass Liquid Leading, Gallery Glass Translucent Colored Paints, and, (after having discovered an issue) repaired and completely sealed with Gallery Glass Crystal Clear. For the outline template, I used a line drawing I found online. For design ideas, you can use line drawings or even kids coloring pages, then tape them to the back side of the glass. Follow the template with your liquid leading and voila.
Materials List for this project
Printed Template
The above link leads to the web results of searching Google for the words "line drawings for stained glass". I recommend filtering the results by selecting the images tab, then select Tools, Usage Rights, Creative Commons licenses, then select Size, Large. You might also search for "free templates for stained glass" or "coloring pages for kids". Once you find a design you like you can save it to your computer and crop and/or resize it, print it out, then cut it to fit and tape it to the back of your glass sheet to use as a template for your liquid lead lines.
Gallery Glass 19701 Liquid Leading
The Gallery Glass brand will remain flexible when it dries so the window cling is repositionable for some time to come. Amazon link above, or you can buy it direct from the manufacturer here: Gallery Glass ® Leading - Black, 8 oz. - 19701 at PlaidOnline
Gallery Glass Translucent Colors
While there are a few options for translucent glass paints, I find Gallery Glass is the best to make flexible window clings. The resulting window cling, or window sticker as some like to call them, will be flexible and repositionable for awhile - a few months maybe. From experience, I can say that window clings made with these materials, if left on a window for 2 years, will become brittle and difficult to remove without completely destroying them. One suggestion we might try - in order to remove them without destroying them - is to cover them again with a thick layer of Gallery Glass Crystal Clear, which should hopefully soften the design underneath it while it sits overnight, so that it can be peeled off the window in one piece. If you try this idea, please do let me know the results!
Gallery Glass Crystal Clear, two size options available:
Gallery Glass Crystal Clear 16001, 2 ounce bottle on Amazon or
Gallery Glass Crystal Clear 19699, 8 ounce bottle on PlaidOnline
Like all the Gallery Glass translucent paints, it starts out opaque (light does not pass through it) but becomes translucent (light readily passes through it) when it is fully dried. When the colors are compete and fully dry, I will cover the entire design with one or two layers of clear. This will make it thicker and stronger, and ensure all the elements are sealed together. You can see in my example below what happens when the design is not completely sealed in clear.
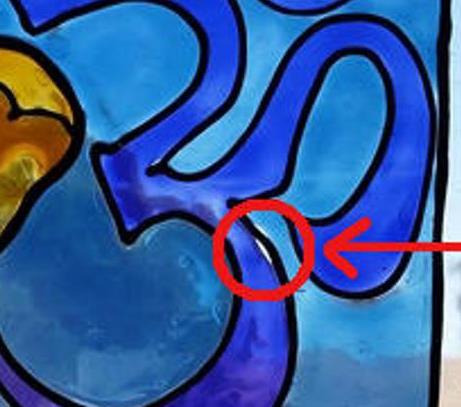
Zoomed in to the unsealed Ganesha which was displayed on a window for a few weeks. When I attempted to peel the cling off the glass the color section tore away from the lead line leaving a gaping hole. I was able to fix it by replacing the blue and allowing it to dry, then covering the entire project with Gallery Glass Crystal Clear. After that it was easily repositionable and didn't tear apart again.
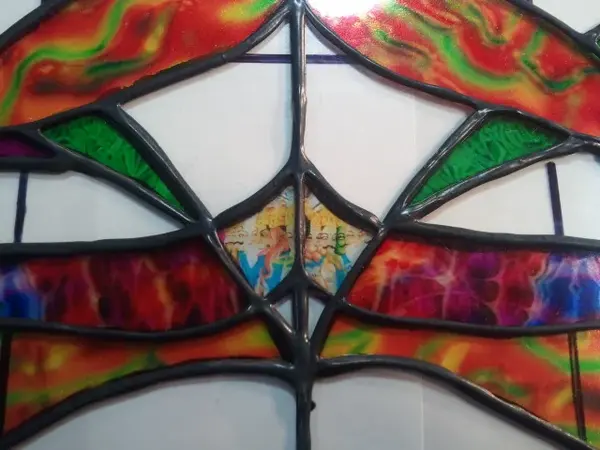
Edwardian Nouveau design on 18"x24" glass, with embedded elements, made with Gallery Glass paints.
Sometimes I embed little elements directly into the paint. In this one I created some random colorful designs on my computer, printed them on clear overhead projector sheets, cut them out and embedded them in resin.
In the center of the closeup above, you might recognize part of a scene from a Jimi Hendrix album. I scanned the album, cropped it, enhanced the colors, printed it on overhead projector sheets, cut it to fit the shape and embedded it on the glass in resin.
The surrounding patterns are also not paint! They are random color patterns and designs cropped from other larger photos of things I had or found, then altered or enhanced and super- saturated the color.
Using my inkjet printer, I printed the random designs on clear transparency sheets then cut them to fit in the sections.
Materials List for this project
Gallery Glass 19701 Liquid Leading
Was used to create the faux lead lines.
Gallery Glass Translucent Colors
Used to make the single colors
Gallery Glass Crystal Clear, two size options available:
Gallery Glass Crystal Clear 16001, 2 ounce bottle on Amazon or
Gallery Glass Crystal Clear 19699, 8 ounce bottle on PlaidOnline
Used to cover the entire project when it was done, and to add texture to the clear uncolored sections.
Inkjet Printable Transparency Sheets
Numerous brands and pack sizes available, I have used this one and other generic brands, all have worked well for me. Be sure to increase the color saturation before printing, it's very different from printing on matte white paper. Take note that there will be a printable side (slightly frosty looking) and a non-printable side (high gloss finish).
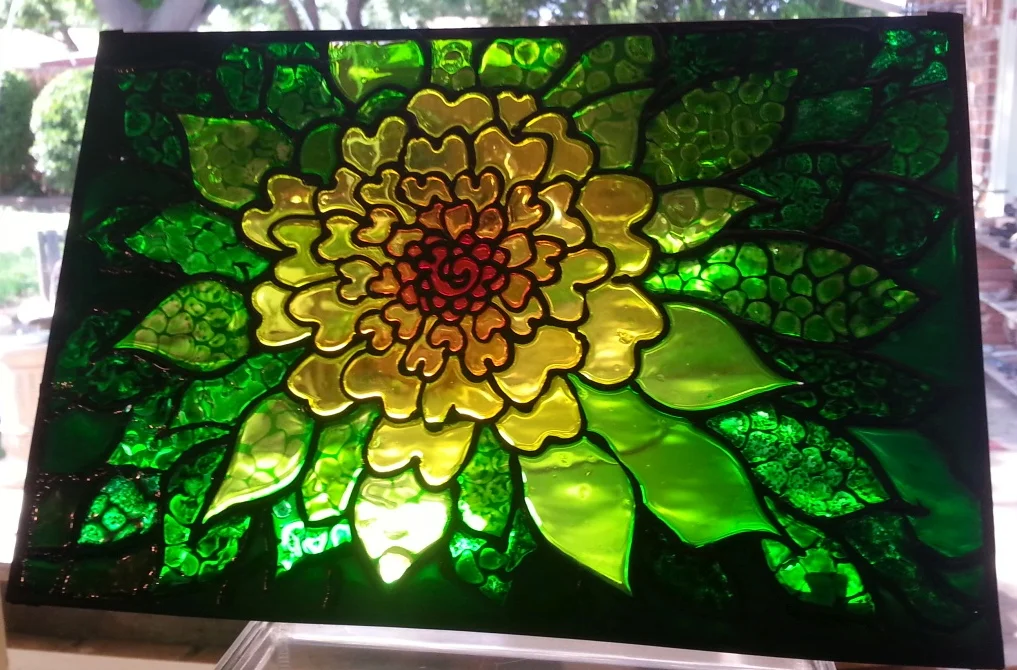
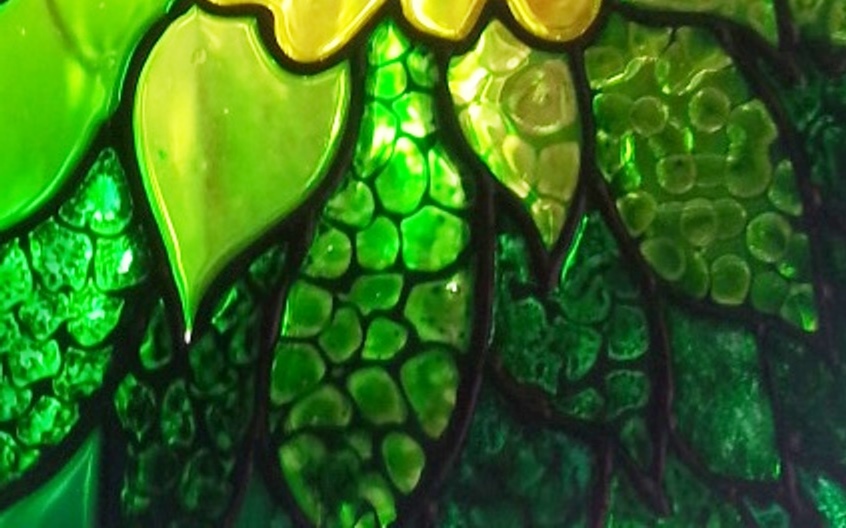
For this piece I did not draw a template first, I just winged it and freehanded the lead lines with Pebeo Cerne Relief outliner. When they were dry I filled the sections with Pebeo Vitrail glass paint, the patterns in the leaves were achieved by adding drops of Pebeo Vitrail Lightening Medium into the green while the paint was still fluid.
Materials List for this project
Pebeo Vitrail, Cerne Relief Dimensional Paint
For the outliner
Pebeo Vitrail Glass Paint
Colors used in this piece: Orange, Yellow, Lemon, Apple Green, Chartreuse and Greengold
Pebeo Vitrail Lightening Medium
Dropped into the wet paint this creates unique patterns that expand outward
Pebeo Vitrail, Cerne Relief Dimensional Paint
For the outliner
Pebeo Vitrail Glass Paint
Colors used in this piece: Orange, Yellow, Lemon, Apple Green, Chartreuse and Greengold
Pebeo Vitrail Lightening Medium
Dropped into the wet paint this creates unique patterns that expand outward
Detail of some of the possible effects made by adding droplets of Pebeo Lightening Medium into the still wet paint. Different effects are the result of adding the drops at different stages of dryness. The paint tends to dry by first getting thicker (as the solvent evaporates) and finally a hard film forms on the outermost layer (by then its too late to add lightening medium). For the top right leaf I added Pebeo Vitrail Lemon, istead of lightening medium, to see how it would turn out.
Other Accessories I use
Glass Eye Droppers
I use these for all glass paints (except Gallery Glass which is thick and each bottle is its own dispenser) to get the paint out of the bottle and into a mixing cup or directly onto the glass. I prefer the glass eye droppers more than the plastic ones because they are easier to clean and not eroded by the solvent or stained by the paint.
Portion Cups with Lids, 2 ounce
I use these as color mixing cups, and temporary storage of the paint for a piece I am working on, so that the original bottle of paint does not dry out while the lid is off.
Recycled Glass Jar with lid
To keep solvent in. The solvent is used to clean brushes and can be used over and over again. I like a big sturdy glass that wont easily tip over, such as an old pickle jar.
Paint Brushes
I do use paint brushes, but not to apply the paint! Small chisel tip brushes are a good tool to suck up wayward bubbles and debris on the glass painting before it dries.
Bubble Level
To make sure the surface is level while a project is drying. There's nothing more frustrating then spending hours on a piece and leaving it to dry, only to find the paint flowed over the walls or off the glass because the surface was not level.
Candle Warmer
These inexpensive Candle Warmers work just as well as their expensive counterparts called Coffee Cup Warmers to keep your tea or coffee hot while working!
Bottles with Nozzles
I use these for custom colors that I've mixed. The nozzle tip makes for a handy dispenser right onto the glass.
Lint Free Paper Towels
After cleaning your brush, hands, etc with the solvent, regular paper towels will spew lint into the air and invariably onto your wet painting. No one likes fuzzy stained glass.
Artists Light Pad
Not required, but it sure helps to be able to see the details of what you're doing. Especially helpful to locate and remove bubbles and debris in the painting before it dries. It's basically a pad that is backlit with lights. There are many brands and price ranges out there to choose from. I use an Artograph A930 which is 9" x 12" for small pieces, and the Artograph A950 which is 24" x 17", for large paintings. The new models have upgraded features that my old models don't have, such as brightness control.
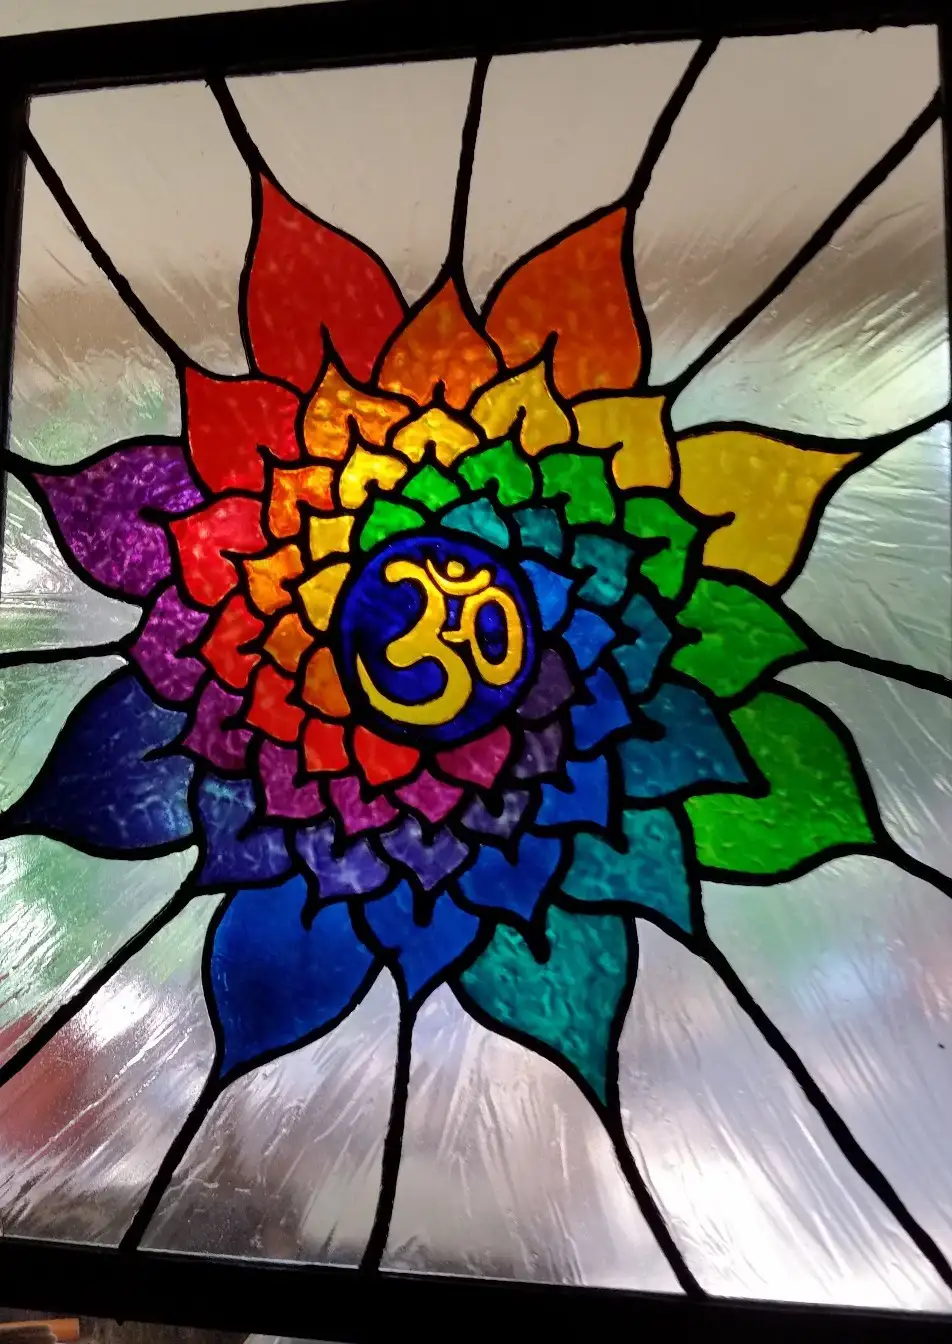
OM Rainbow Blossom made with custom mixed Pebeo Vitrail colors, texture added with Liquitex Professional Gloss Gel Medium.
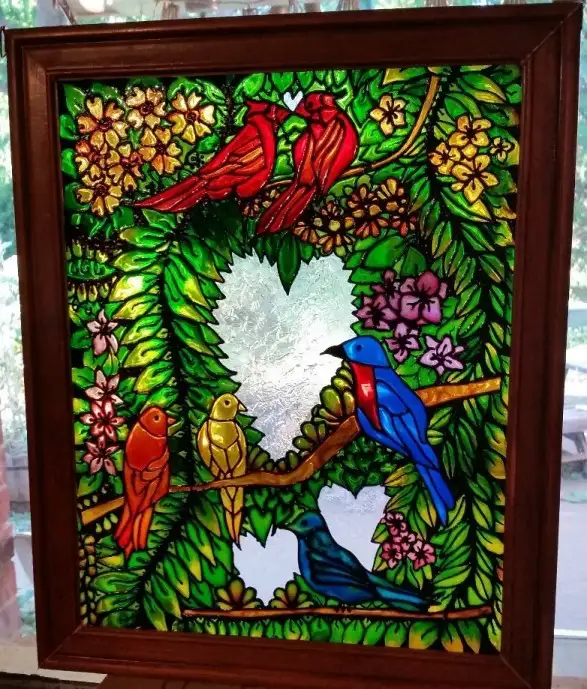
Love Birds, made with custom mixed Pebeo Vitrail colors, texture added with Liquitex Professional Gloss Gel Medium.
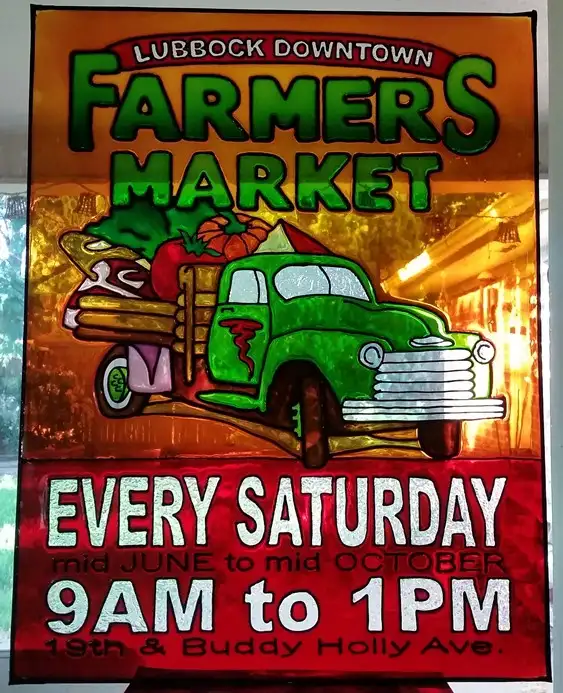
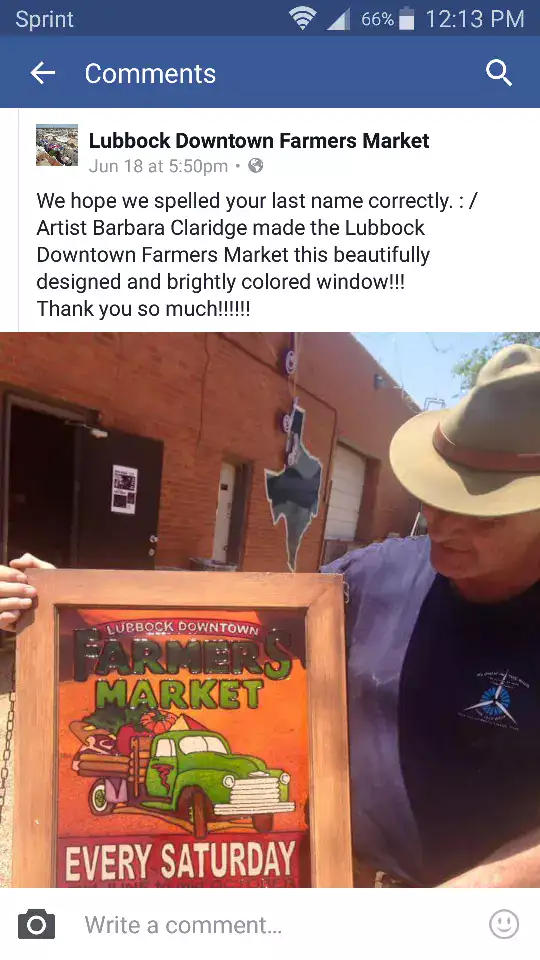
Made as a gift for the Lubbock Downtown Farmers Market association, to thank them for letting me be a vendor there for so many years. It was a great time I will never forget!
Made with Pebeo Vitrail and Pebeo Cerne Relief.
Made with Pebeo Vitrail and Pebeo Cerne Relief.
First Marley Hebrew Coptic Church of St. George, gift made for one of the members. Made with Pebeo Vitrail and Pebeo Cerne Relief.
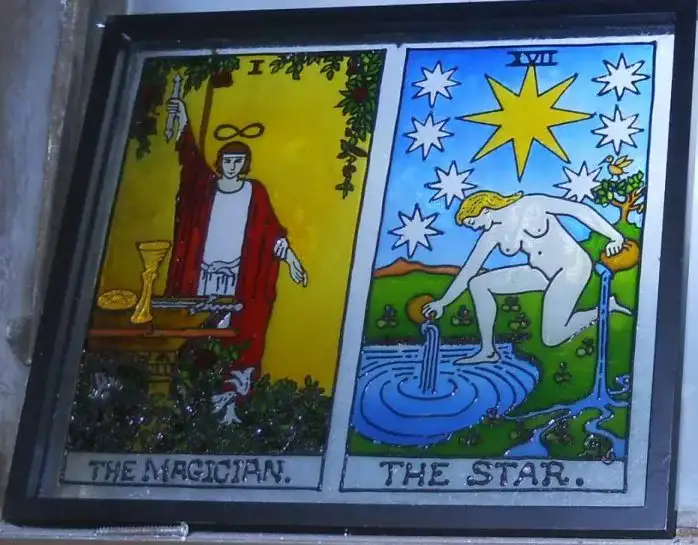
The Magician and The Star Tarot Cards Stained Glass paintings made with Pebeo Vitrail, Pebeo Cerne Relief and Liquitex Professional Gloss Gel Medium.
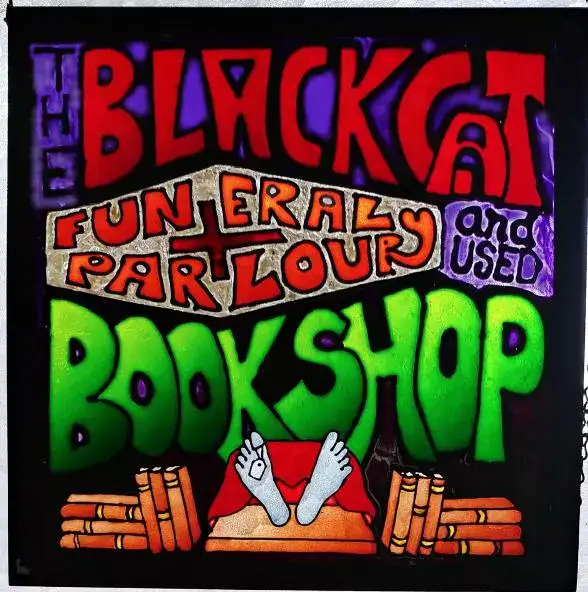
The Black Cat Funeral Parlour and Used Bookshop (a local band from the 60's now defunct) made with Pebeo Vitrail, Pebeo Cerne Relief and Liquitex Professional Gloss Gel Medium.
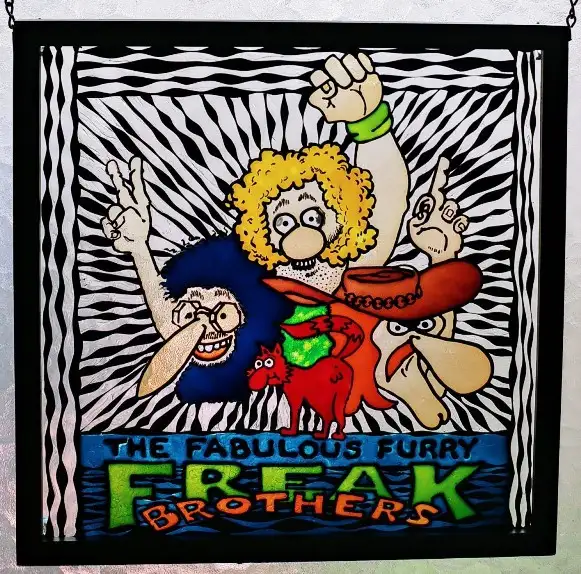
The Fabulous Furry Freak Brothers made with Pebeo Vitrail, Pebeo Cerne Relief for the faces and lettering outline, and simple electrician's tape cut with an X-Acto knife for the wavy lines, finished with and Liquitex Professional Gloss Gel Medium.





Materials List - Prepare glass and design draft
Sharpie Retractable Permanent Markers, Black, Red and Blue set
Easily removed from glass with rubbing alcohol (isopropyl alcohol) and a paper towel
I like using a colored marker for the draft because it is easily distinguishable from the black lead lines that will go on the front side. Here is an 8 color set.
EXPO Low Odor Dry Erase Marker Starter Set, Chisel Tip
Dry erase pens are a good option to make lots of quick changes or corrections (just wipe off with your finger or a dry paper towel. The downside is that because they are so easily wiped off your design might be wiped off accidentally just by touching it or brushing up against it.
Vinyl Electrical Tape
Vinyl electrical tape is somewhat stretchy and makes a good edge covering for the glass. Any brand should work, I usually use Duck, Hyper Tough or any inexpensive generic brand that is available.
X-Acto Knife
After completely covering the edges and corner of the glass with electrical tape, I trim the tape on both sides of the glass (not shown) with an X-Acto knife or generic Hobby Knife so that the taped edges wont show through on the visible portion of the design (the small edges that aren't covered by the fame). I trim it to leave about a 1/4" on all sides, front and back.
Materials List - Adding lead lines
There are a few different options you can use for the faux lead-lines:
Pebeo Vitrail, Cerne Relief Dimensional Paint
This is the expensive, but long-lasting and professional grade of dimensional paint used for creating the raised lines required to contain the liquid flowing paint in it's sections. Comes in a small (0.68 ounce) squeeze tube. It takes some practice to dispense it evenly in uniform lines. One tube will cover perhaps one painting, depending on the complexity of the design (how many lead lines you need) and the size of the glass you need to cover.
Gallery Glass 19701 Liquid Leading
Comes in 8 ounce or 4 ounce squeeze bottles. It's another learning curve learning to draw with a bottle, but like riding a bicycle, once you get the hang of it, you will be able to do it without thinking.
Tulip Dimensional Fabric Paint
Works just as well as the specialty stained glass versions above, plus it comes in other colors.
DIY Recipe
Ingredients list to make your own dimensional paint "lead lines", basically glue+powder+paint!
Materials List - Glass paint options
Pebeo Vitrail
Pebeo Vitrail is my all time favorite glass paint. Pros: Professional quality stained glass paint. The colors are super saturated so most need to be diluted with clear Vitrail lightener before using in a project. Pebeo Vitrail paint dries to a hard glass-like finish which makes it perfect for professional quality stained glass projects. Cons: Expensive, but a little goes a long way. Solvent-based so additional supplies are needed, I use Weber Odorless Turpenoid exclusively for my stained glass projects that use solvent-based paint (see below). Note: make sure to get Pebeo Vitrail which air-dries to a hard glass-like finish, not Pebeo "Vitrea" which needs to be cured in an oven, it would be suitable for small pieces only.
Marabu GlasArt
The colors are vibrant, it doesn't need to be diluted first, and they dry to a hard glass-like finish and produce professional results. This product is solvent-based so you will need Weber Odorless Turpenoid or another paint solvent to clean up messes, correct mistakes and clean your tools when you are done. Note: The bad reviews are by people using it incorrectly, it shouldn't be "applied with a paintbrush", it's best used by directly and carefully pouring it into the sections.
Weber Odorless Turpenoid
This is required only if you are using a solvent-based paint such as Pebeo Vitrail or Marabu GlasArt. It is available on Amazon if you need it quickly and can't find it locally. It is also usually available at craft stress such as Michaels and Hobby Lobby, and some hardware stores such as Lowe's or Home Depot, and most online art supply websites.
Gallery Glass
Entry level glass paint, comes in lots of great colors, readily available at local craft stores such as Michaels or Hobby Lobby. Because it dries to a rubbery flexible finish, I use it to make window clings with. Water soluble, easy cleanup. Cons: Prone to bubbles. The paint in its liquid form is opaque so often you wont see bubbles or dirt until after the paint has cured. If you try to mix a new color by mixing 2 colors, your paint will end up a bubbly mess and you will have to let the bottle sit for a week until it settles down.
Elmers Clear Glue and Food Coloring
Good as inexpensive projects for kids, you will need some disposable cups to mix colors in and airtight dispensing bottles if you wish to keep it and use it again once colored. Dries to a rubbery flexible finish, good for making removable window clings. Easy clean up with water. Cons: The colors will fade in the sun, especially red, unless you take additional steps to protect it with a UV blocker such as Krylon UV-Resistant Clear
Clear Gloss Gel Medium - any brand will do as long as it dries clear. I use this in two ways, as a topcoat to seal gallery glass and Elmers glue creations (it adds a level of binder so your project doesn't separate at the seams where the lead lines meet the paint when you are pulling it off a window) and to add "texture" to Pebeo and Marabu paints. I can also create entire sections of faux paned "old glass" by laying this down with a painters knife then adding texture and shape to it with fingers, rubber stamps, combs, paintbrushes, etc.
The kind that comes in a tube (above) has a medium consistency, suitable for most stained glass projects. There are also heavy-bodied paste-like options such as Liquitex Professional Gloss Gel Medium which comes in a tub that needs to be scooped out, laid down with a painters knife, then textured.
Important note on glass paints
If you find other brands marketed as "glass paint" make sure they are translucent! I've wasted plenty of money on "glass paints" that ended up being opaque (light doesn't shine through them making them useless in stained glass projects). Often "glass paint" just means they will adhere to non-porous substrates such as glass and ceramic.
